BUYING A SANDRAIL 101
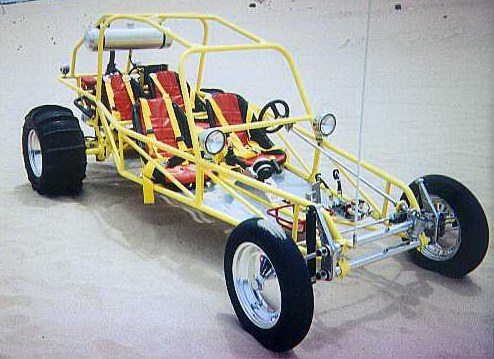

The Chassis
Step 1: DIY or Turnkey?
Acme Car Company and Berrien Buggy is a full-service dune buggy and kit car business. We sell everything needed to build a complete car, in addition to performing custom turnkey builds to your specifications. If you have a good set of tools, a work space, a bit of mechanical knowledge, and a few weekends, you can have a great time building your custom buggy. And we can supply chassis, suspension components, transmissions, engines, and all the little odds and ends.
“DIY” Knockdown and Tacked kits: Berrien offers three styles of tacked “project” kits. For all kits, you’ll need a welder (preferably MIG or TIG), a level, tape measure, and a 4 1/2” angle grinder.
Knockdown: Our “knockdown” kits (2 seat Warrior and 4 seat Cruiser) are by far the most economical to buy and ship, but require the most assembly. These consist of a tacked floor section, with all other assembly to be done by the customer.
Side By Side: Our “side-by-side” models are offered for best shipping costs almost anywhere in the world. They consist of the two side assemblies of the chassis (arm rails and bottom rails, with all uprights and diagonals) that are tacked together, as well as the front floor center section (front and rear crossbars with two center bars), and a box with all the rest of the tubes for the upper roll cage and rear cage sections. These can be a bit more challenging to put together, and will most likely require an assistant to assemble, but ship flatter for better cost.
Top & Bottom: Our “top-and-bottom” kits are designed for more ease of assembly, but may have a higher shipping cost. The entire floor of the chassis is tacked together, as well as the upper roll cage is assembled. The only thing the customer needs to assemble is the side “uprights and diagonals”, as well as the rear cage. One person alone can easily do assembly. While these chassis CAN be shipped, it is recommended that if you intend to buy a “top-and-bottom” kit, you intend to pick it up at our facility or at one of our many dealerships.
Berrien also offers fully welded chassis. These require the least amount of assembly, but some welding is still required (ie., seat belt tabs, steering bearing mounts, pedal mounts, shift box, etc…) Fully welded chassis are the least economical when it comes to shipping. It can become very expensive to ship a fully welded chassis. Again, pickup at our facility or a dealership is recommended.
If you’re not mechanically inclined, we can walk you through the step by step process of selecting components for your turn-key build. And we’ll do the work for you. Our mechanics have been in the Volkswagen business for years, and we use only the finest parts from well-known suppliers. Please call for details and quotes.
Step 2:Street, Sand, Woods, Show, or Mixed-Use?
In many states, dune buggies and sandrails can be made street legal. *Check with your local DMV for applicable laws and requirements. Deciding which use you intend your buggy for will guide your decision making process along the way. It’s very important to make this decision early on in the process, because certain suspension and drivetrain components will work better for some uses, and be less effective for others.
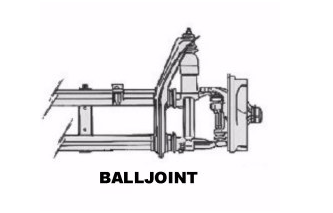
For Street, Show, and light off-road use, the later suspension combinations (Ball-joint front/IRS rear) will be more effective by offering a smoother ride, and better steering and control. However, these later suspension designs are more prone to failure under heavy off-road use.
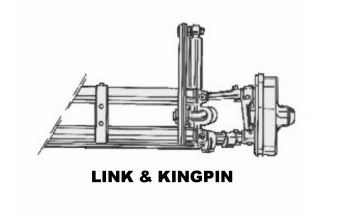
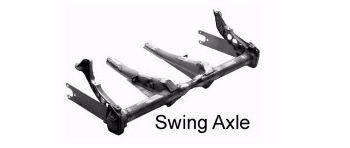
For moderate to heavy off-road use, earlier designs (Link-and-kingpin front/Swing axle rear) offer a near-bulletproof operation. The drawback, however, is that these designs lack somewhat in smooth ride and on-road performance.
Step 3: Donor Car.
Having a parts “donor” car can be the most economical way to build a dune buggy. Most chassis- and suspension components can be harvested to build your new car. Our chassis are designed to use suspension components from Volkswagen (Type 1) Beetles up to 1977 (excluding Super Beetle—rear torsion housing from a Super Beetle can be used, but the MacPherson strut front suspension is incompatible with our chassis.)
Front torsion-leaf spring suspensions from pre-1965 were of a link-and-kingpin trailing arm style. The easiest way to identify a link-and-kingpin front suspension is to look at the upper shock mounting location. The shock bolt runs parallel with the ground.
Front suspensions from mid-1966 until 1977 were of a ball-joint trailing arm style. On the ball-joint style shocks, the upper mounting stud goes through the shock tower vertically.
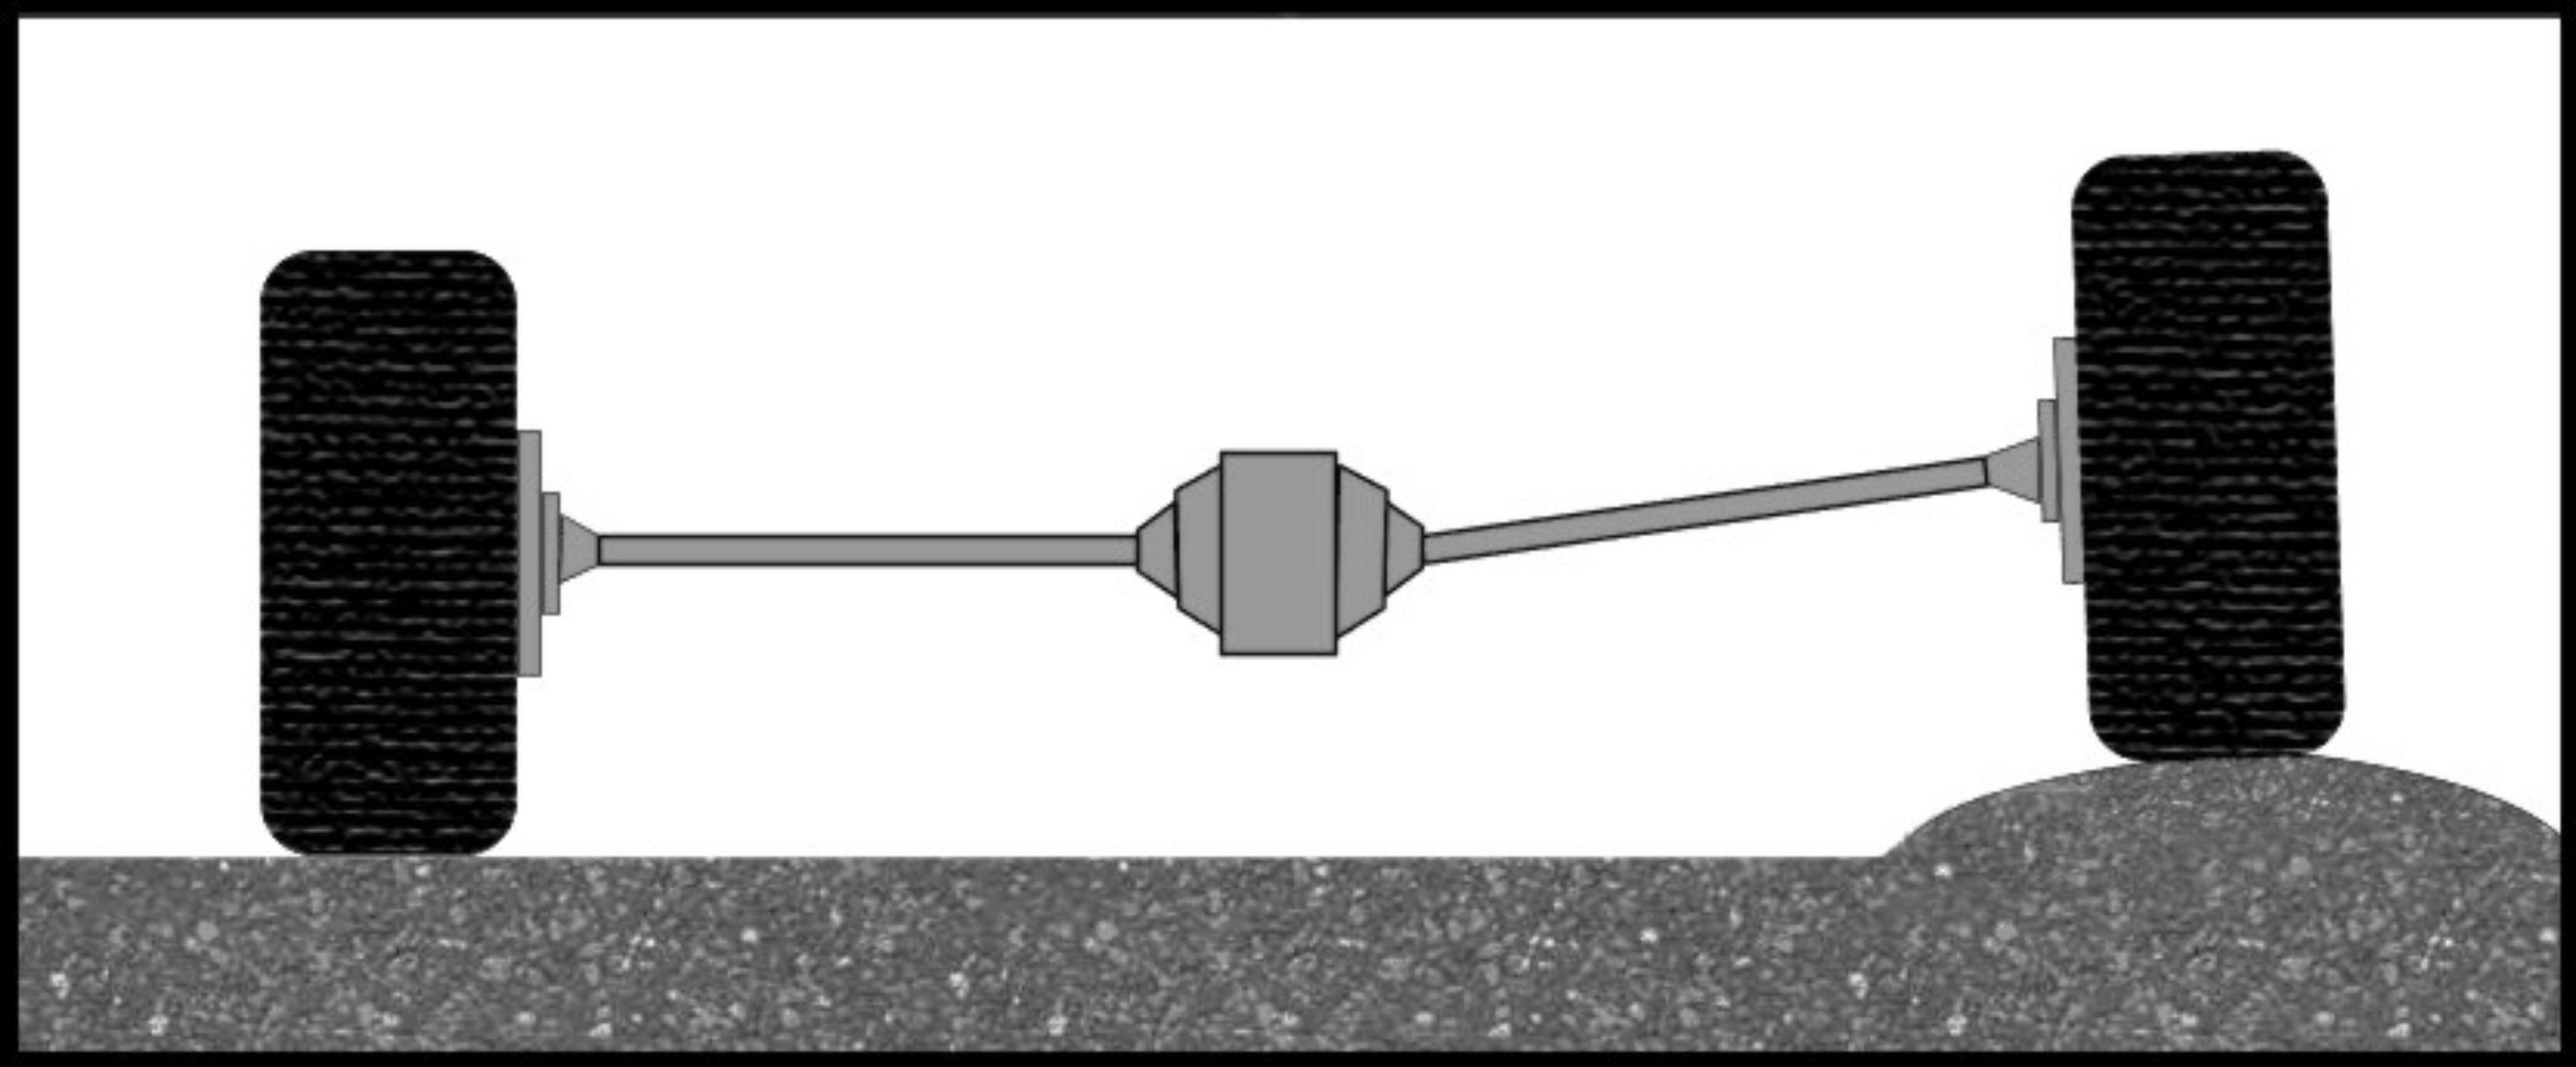
Rear suspensions up to 1968 were a swing axle torsion bar style. The axles pivot only at the transmission, causing significant camber change as the wheel moves through its travel. The easiest way of identifying a swing axle torsion housing is to look at the spring plates connected to the axle. They are about 16” long, and have three bolts that connect the axle housing to the spring plate.
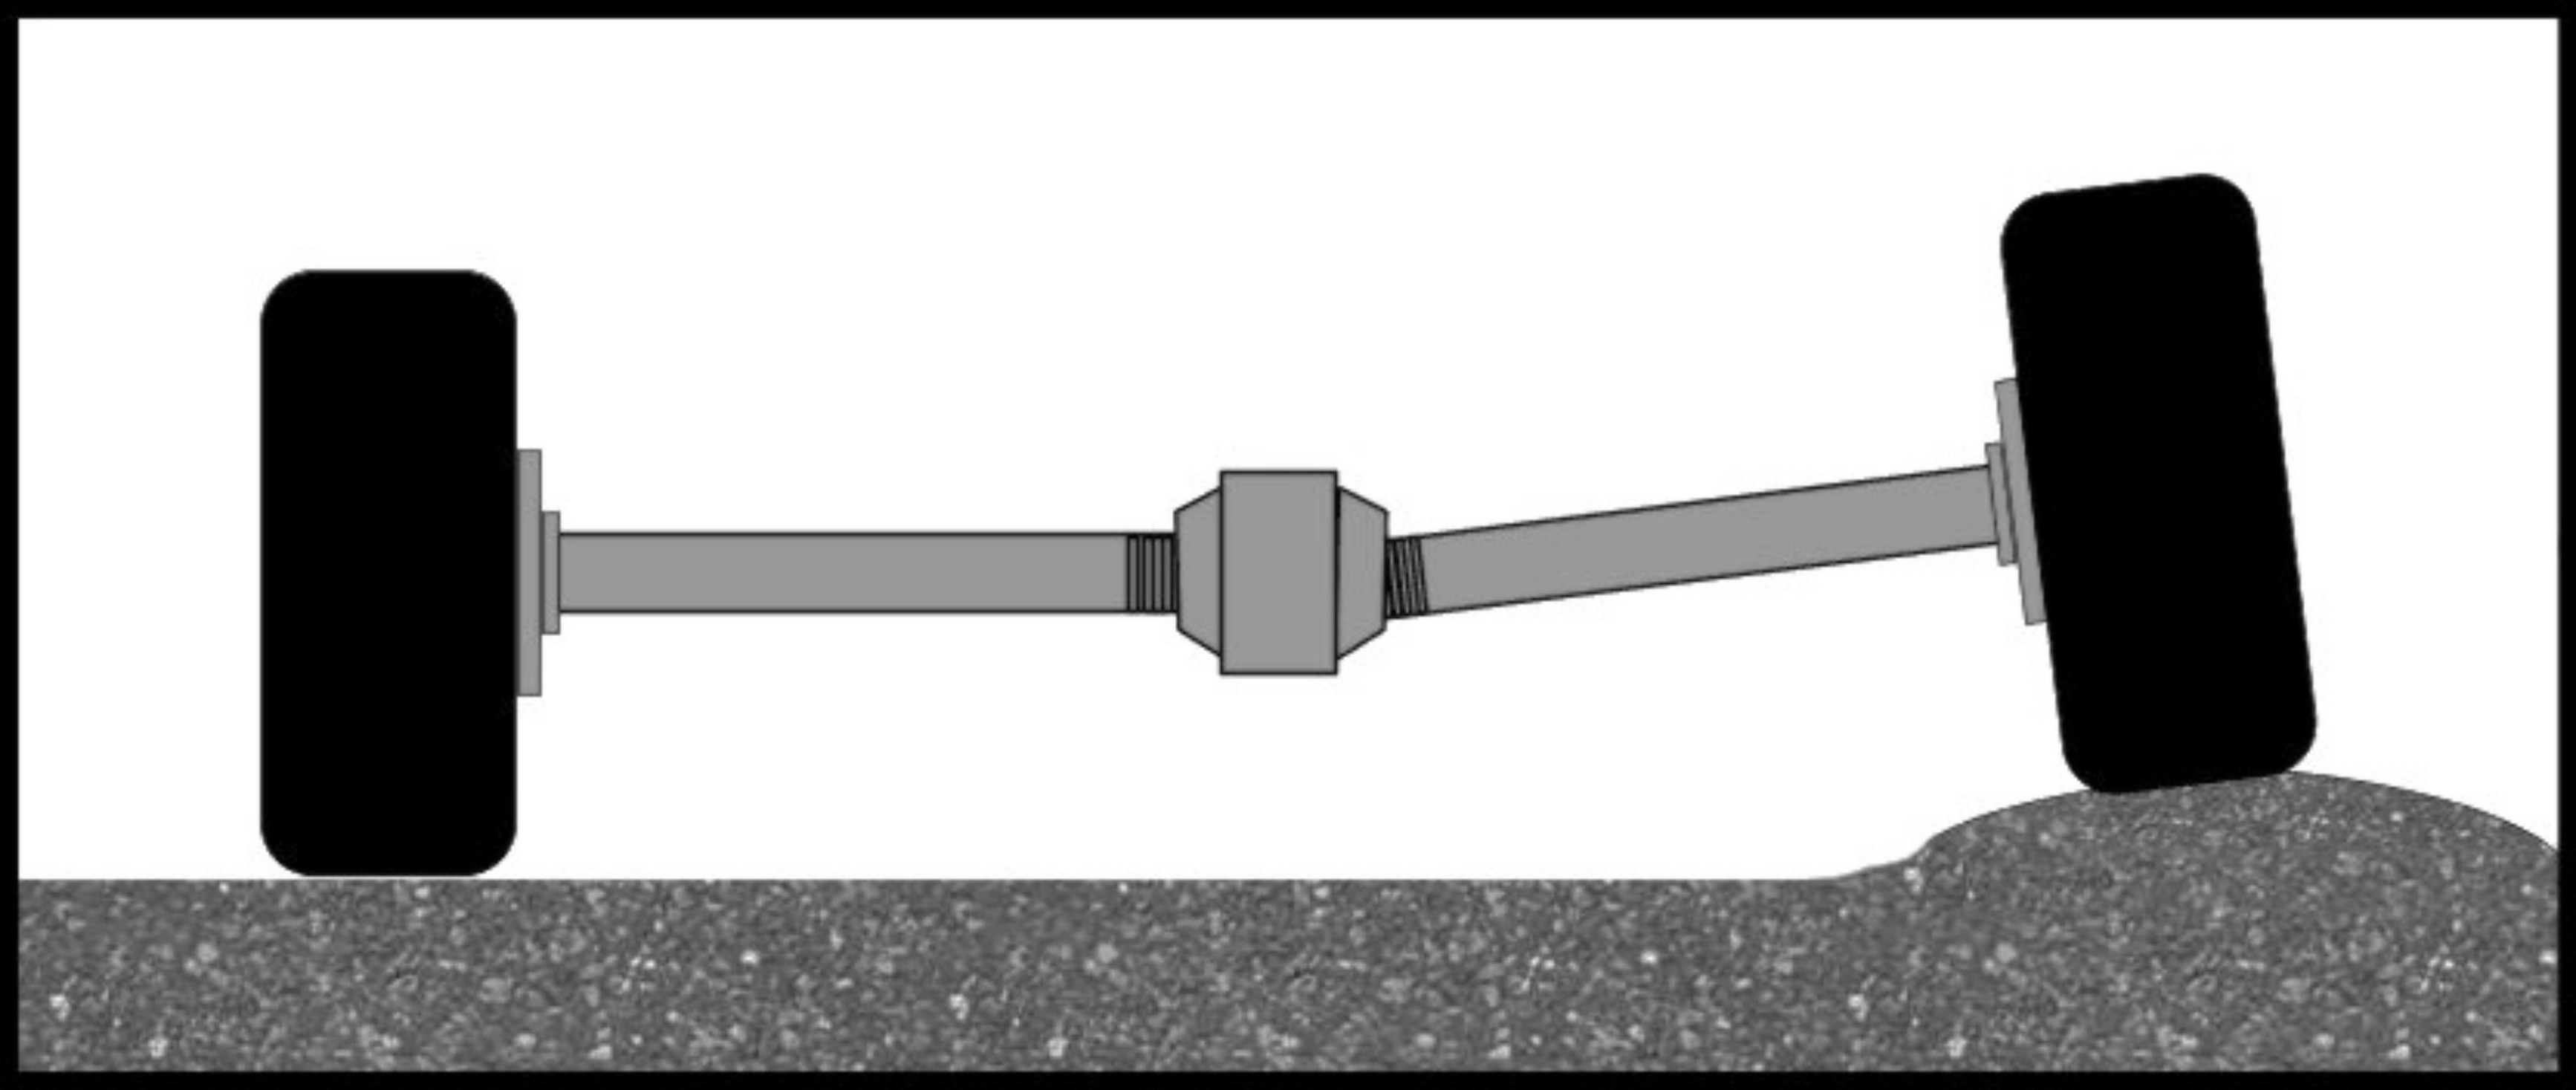
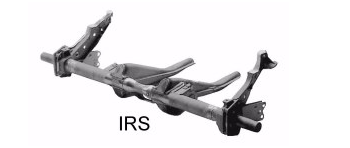
Rear suspensions from 1968-on were an Independent Rear Suspension (IRS) style, using Constant Velocity (CV) joints at the transmission and also out at the wheel. This allows the wheel to move through its suspension travel with minimal camber change. Identification of an IRS torsion housing is made again by the much shorter (10”) spring plates, and the presence of trailing arm “pockets” or clips, at the junction of the torsion tube and the frame horns.
Within the years of the independent rear suspension, it is also important to know the front transmission mounting style. Pre-1972, the nose cone of the transmission mounted with a two bolt rubber and steel mount. The bolts mating this rubber mount to the torsion housing ran parallel to the ground, and the steel mount on the torsion housing was oval-shaped, with a center hole. From 1973 to 1979, the nose cone of the transmission mounted with a three bolt rubber and steel mount. The torsion housing had two studs that pointed directly at the ground.
Once you’ve acquired your donor car, it’s best to look it over, and examine it’s components very carefully. Look for anything that can be salvaged to use on your new car. Some components can be VERY hard, expensive or even impossible to find new. For instance, most of our fiberglass dune buggy bodies are designed to be used with a stock VW steering column. These are getting harder and harder to find. We have parts available to rebuild columns, but the steering shaft itself is not available new. Any parts on your car that are usable should be saved until the completion of your car.
Our torsion core policy is found here: Acme Car Co. Torsion Policy
Step 4: Let’s talk Wheelbase.
Once you know your suspension combination and intended use, you can begin to select a chassis. The wheelbase describes the length of the car from the center of the front wheel to the center of the rear wheel. The wheelbase of your chassis is very important. The general rule of thumb is, “The longer the wheelbase, the more stability. The shorter the wheelbase, the better cornering ability.” For tight cornering and woods running, a short wheelbase is more desirable, to allow quick movement around obstacles without having to back up. But, in wide-open spaces and on sand, a short wheelbase can be a hindrance to stable operation. A longer wheelbase where cornering is not as critical can add a safer feeling to the ride. Berrien Buggy by Acme offers sandrails in wheelbases of 90”, 95”, 100”, 105”, 112”, and 115”.
Another thing to consider is the wheel track width. Track width is the width of the suspension, measured from the centerline to centerline of the wheels. As with wheelbase, the wider the wheel track, the more stable the car will be. But you will sacrifice some “tight squeeze” ability, as the chassis will be wider. Berrien offers cars in stock VW width, or (for a small additional charge on certain models) 6” wider. Adding 6” to the width also adds to the cockpit width, allowing for larger, more comfortable seats and storage.
Step 5: Cockpit dimensions.
By now, you should have a good idea of your use, and what you want to get out of the buggy. Now, you have to look at comfort. The best way to do this is to have a rock-solid idea of what seats you’re planning to use. It’s best to either buy your seats BEFORE you buy your chassis, or at the very least, go to a dealer near you, and sit in one. You’ll need to have an assistant with you, because you need to measure not only the seat, but you, and any intended riders who may be larger than you, sitting in the seat. You’ll want to sit in the seat on the floor (or, if you plan to use seat tracks, on them) and measure from the floor to the top of your head. If you plan on wearing a helmet in the car, make sure to bring it with you, and take your measurement to the top of the helmet. You need a minimum 2” of clearance between you and any part of the cage. You’ll want to compare your measurement with the stated height dimensions on our product pages to make sure the cockpit is high enough for you. Measurements on our product pages are measured from the lowest part of the bottom floor rails to the highest point on the bottom of the top rails. If you plan to mount your floor and seats ABOVE the bottom rails, subtract 1 ½”. Berrien offers an additional 3” of height from stock for no extra charge, but if you need more than 3”, give us a call, and we can get you a price quote for a custom height.
Stock cockpit width is measured at the widest point of the cockpit (inside dimension). Again, for an additional charge, certain chassis’ may be widened 6”.
Step 6: Call Acme Car Company, and place your order!
Remember to have all your suspension, height, and width information ready, and also any other questions you may have. We are happy to help!